Introduction: Why DIY Miniature Bricks Matter
In the world of dollhouses and scale dioramas, realism comes down to the small details. A smooth wall looks flat and sterile; textured brick, stone, or varied masonry conveys depth, history, and character. For a diorama to feel lived-in, its materials must speak authentically at miniature scale. That’s where DIY miniature bricks enter the scene.
Whether recreating a weathered redbrick cottage, a modern townhouse, or an industrial warehouse, hobbyists often find off-the-shelf brick sheets limiting in scale, color variation, or texture. Creating your own miniature blocks gives you total control—scale, hue, mortar, aging—and enables seamless integration into your scenes.
This guide dives deep into everything you need to know about crafting miniature bricks: from materials, methods, finishing, and project ideas, to troubleshooting and pro tips. After reading this, you’ll be able to confidently design and apply bricks in your next build—whether for dollhouse bricks, diorama walls, chimneys, pathways, or even miniature brick landscaping.
Understanding Scale, Proportions & Brick Dimensions
Before crafting any miniature, it’s essential to think through scale. Most dollhouses or dioramas use scales like 1:12, 1:24, or 1:48. The real-world standard brick (roughly 3 ⅝″ × 2 ¼″ × ⅝″, or ~92 mm × 57 mm × 16 mm) becomes much smaller in miniature. At 1:12 scale, that’s about 7.7 mm × 4.8 mm × 1.3 mm.
However, many hobbyists choose to exaggerate thickness slightly for durability and visual effect. For example, a DIY creator might set mini brick blocks to 8 × 5 × 2 mm. The key is consistency—once you decide on your “brick size,” maintain the same proportions across your miniature blocks for cohesion.
In addition, real masonry includes mortar joints, which occupy space. A typical mortar width might be ~3–4 mm in real life, but in miniature you might represent it as 0.5–1 mm, depending on scale. Always calculate your total wall height including mortar lines so your final wall fits architectural elements (windows, doors, cornices).
When crafting bricks, plan lines (courses) in grid guides, or use molds that include mortar recesses. The visual interplay between brick faces and mortar grooves gives realism to the texture.
Choosing the Right Materials
There is no one-size-fits-all material for miniature building materials. Each substrate offers unique benefits and trade-offs. Below are common choices used by advanced hobbyists, along with pros/cons and best practices.
| Material | Pros | Cons | Best Uses / Tips |
|---|---|---|---|
| Polymer clay (e.g. Fimo, Sculpey) | Precise shapes, can bake/harden, comes in many colors | Thinner bricks may warp, need curing | Ideal for decorative panels, small sections, accent walls |
| Air-dry clay / DAS clay | Easy to work with, doesn’t require oven | Slower drying, risk of cracking, limited strength | Great for small batches or accent bricks |
| Grout / cement mixtures | Realistic weight and texture, strong | Heavier, brittle, may crack | Useful for large walls or many bricks — see DIY Miniature DollHouse Bricks for grout method |
| Foam board / insulation foam | Lightweight, easy to carve | Less realistic surface, may require surface texturing | Good for backing walls, low-traffic surfaces |
| Cork sheets | Light, easy to cut, nice texture | Less sharp edges, limited color | For rustic or textured facades (e.g. cork brick technique) |
| Plaster / resin | High fidelity detail, durable | More complex tooling, heavier | Best for mold-cast sections, custom shapes |
| Styrofoam / foamcore with surface finishing | Inexpensive and easy to cut | Poor edge detail unless coated | Suitable for base blocks, then coated or textured |
As you experiment, you may combine materials: e.g. a foam backing with a thin clay brick veneer, or grout bricks on a plywood sub-wall. Always test adhesion, shrinkage, and color behavior before committing to full walls.
Tip: When using clay or grout mixtures, embed very thin wire or mesh reinforcement inside long bricks to reduce warping or fracture over time.
Methods for Miniature Brick Making
This is the heart of the guide. Below are four robust techniques widely used by advanced modelers, along with step-by-step instructions, tips, and tradeoffs. You can choose one method or combine them depending on your project demands.
Method 1: Mold Casting with Grout or Resin (Bulk Production)
This approach is excellent when you need hundreds or thousands of bricks quickly with consistency.
Steps:
- Build a master grid mold. Use thin wood or plastic strips to form a grid (for example 5″ × 5″ board) with square cavities sized to your bricks.
- Treat with release agent. Apply a non-stick spray (e.g. cooking spray, silicone release) so bricks will come out cleanly.
- Prepare mixture. For example, mix sanded tile grout + acrylic fortifier + concrete coloring. The fortifier helps prevent crumbling in fine pieces.
- Pour & level. Fill the mold uniformly, then scrape off excess with a flat edge to level the top.
- Cure / dry. Let the bricks dry fully (often about 9 hours or longer depending on humidity).
- Demold. Tilt the mold and gently push out bricks with a matching push-stick that fits one brick cavity.
- Finish & seal. You can sand edges, file surfaces, and apply clear coat sealers. Then use a grout wash or mortar between bricks during installation.
Advantages: Very uniform, efficient for large quantities, strong once cured.
Disadvantages: Requires mold-making, heavier bricks, limited to rectilinear shapes unless you build specialty molds.
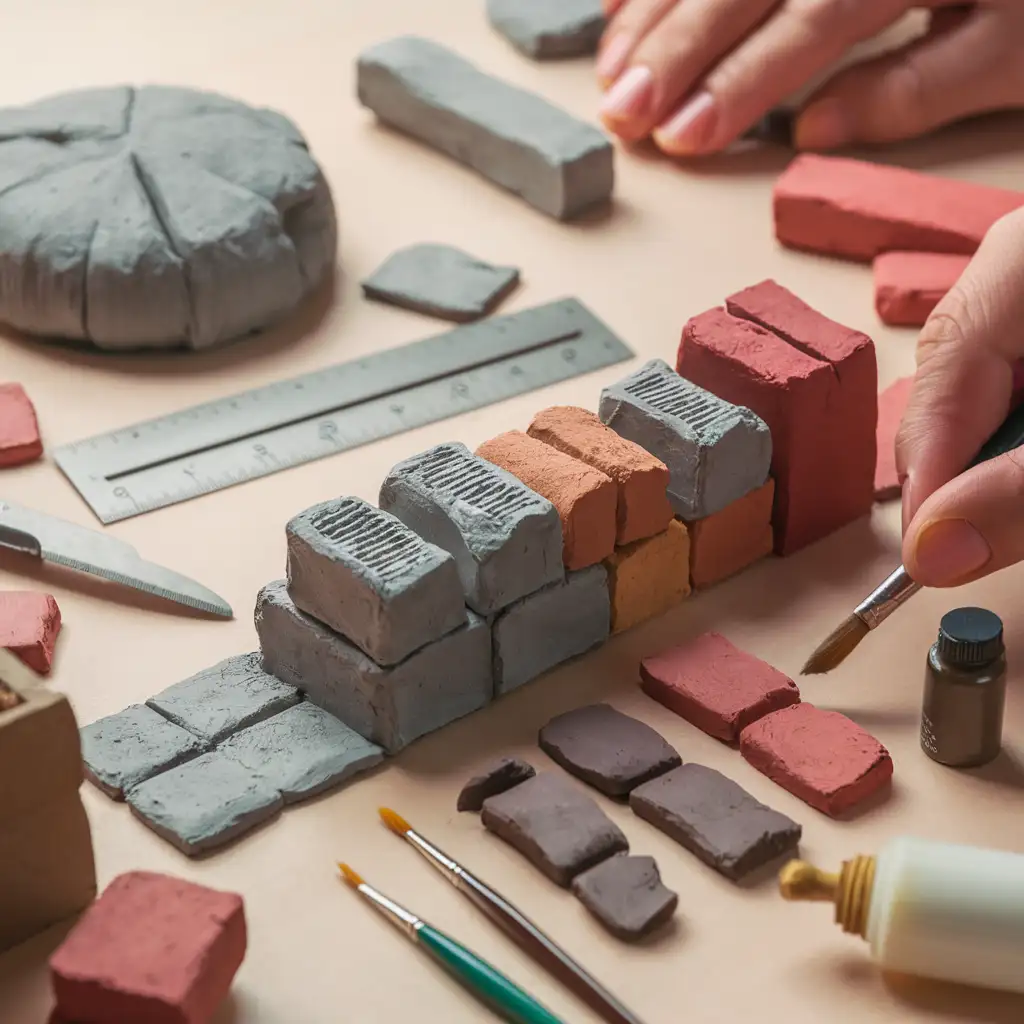
Method 2: Hand-cut Polymer Clay or Air-dry Clay (“Brick Sheet Carving”)
This method offers flexibility and control, especially for accent areas or decorative panels.
Steps:
- Roll out clay. Use a rolling pin between cauls or guides to get exact thickness.
- Smooth & texture. Use a soft sponge, toothbrush, or stipple tool to impart brick texture.
- Incise brick lines. Using a fine knife or needle tool, mark horizontal and vertical lines to define mortar separations.
- Score face detail. Optionally make small chips or tiny pits for realism.
- Dry or bake. Depending on the clay type (e.g. DAS is air-dry), allow to fully cure.
- Cut into bricks. Use a ruler and craft knife to separate individual bricks or small strips.
- Sand & bevel. Light sanding and edge-beveling prevent overly sharp edges.
This method is tolerant of irregular shapes—good for chimneys, arches, or decorative faces.
Method 3: Styrofoam or Foam Core Brick Facade
This method is popular due to ease and low cost.
Steps (example from Suzy’s arts & crafts blog):
- Select foam sheets or plates. Lightweight foam, styrofoam plates, or foamcore work well.
- Cut bricks. Use a sharp craft knife and ruler to slice brick sizes; typical miniature brick sizes are scaled down.
- Texturize. Use the back of a craft knife, wire brush, or dab with toothbrush to roughen surfaces.
- Paint & grout. Apply a gray base coat for mortar, then layer brick-colored washes. Use “negative painting”: avoid getting paint in mortar lines.
- Weather & detail. Use dark washes, dry brushing, or pigment powders to age the bricks.
Advantages: Fast, light, easy to cut.
Disadvantages: Less durable, edges may be less sharp, less “honest” texture unless sealed.
Method 4: Cork Brick Technique
Cork can give a natural texture with modest effort.
Approach (as seen in cork brick tutorials):
- Use cork sheets (¼″ thick or thinner) and cut into strips ~1⁄8″ or less.
- Stack strips and cut brick lengths.
- The rough edges lend a more rustic texture.
- Adhere to surfaces with tacky glue; fill gaps with wood filler or spackle.
- Paint or whitewash to achieve desired brick look.
- This method is common for exterior walls in dollhouses, especially for façades where texture and lightness matter.
Constructing & Applying Bricks in Your Build
Once your bricks are made, applying them carefully to your model is essential. Here’s a step-by-step workflow, with pro tips to maintain alignment, aesthetics, and structural integrity.
1. Plan & Dry Fit First
- Draw or map out the wall area: mark openings (windows, doors) and corners.
- Dry fit a sample brick grid to check spacing, course alignment, and thickness impact on trim elements.
- Always leave a tolerance for grout mortar or filling—don’t butt bricks flush unless your method demands it.
2. Substrate & Adhesion
Choose a backing like smooth plywood, foam board, or MDF. Seal untreated surfaces with primer or gesso to avoid adhesive absorption. Use adhesives like PVA glue, hot glue, epoxy, or cyanoacrylate depending on your brick material. For clay or grout bricks, a PVA or polyvinyl white glue applied thinly often suffices. For resin or heavy bricks, consider epoxy or construction adhesive.
3. Laying Course by Course
- Start at the base or window sill; keep a straight edge or level to guide courses.
- Use spacers or strips (e.g. thin cardstock) to maintain consistent mortar gaps.
- Apply adhesive only behind the brick, not on the face.
- Stagger bricks (half-bond laying) where appropriate for realism.
- Incorporate expansion joints or vertical seams where necessary in large walls.
4. Dealing with Windows, Doors & Corners
- Around windows, cut bricks to fit and leave tolerance for trim pieces.
- At corners, you can miter or interlock bricks (if your method allows). For clay bricks, bevel edges or overlap courses.
- For internal corners, don’t forget back bricks or return bricks for depth.
5. Filling Gaps & Mortaring
Once bricks are fixed:
- Use a fine mortar filler (e.g. thinned spackle, fine-grain grout, or acrylic putty).
- Apply mortar with a toothpick, small spatula or fine brush.
- Clean excess mortar quickly; use damp Q-tips or sponge before it sets.
- After mortar cures, lightly sand surfaces to remove residue and highlight edges.
Painting, Grouting & Weathering
The finish is where your miniature bricks come to life. A flat, two-tone brick wall is sterile—layering washes, pigments, and weathering is what convinces the eye at miniature scale.
1. Prime or Base “Mortar” Undercoat
Begin with a neutral gray or off-white wash to act as the mortar shadow tone. This ensures that even in crevices or recessed lines you have contrast. Some crafters paint the whole wall in a “grout” shade first, then layer brick color over it.
2. Brick Color Layers & Variation
- Choose 2–4 shades of brick (red, burnt orange, brown). Acrylics, craft paints, or even powdered pigments are fine.
- Use a dry brushing technique: load your brush, then wipe most paint off, and lightly flick across brick faces.
- Use small sponges or stipple brushes to dab subtle color variation.
- Don’t paint mortar lines—mask them lightly, or use the “negative painting” technique (paint bricks lightly, then re-touch mortar lines).
3. Grout / Mortar Wash & Tint
- Mix thinned white or light gray paint (e.g. 80% water, 20% paint) to simulate mortar wash.
- Lightly wash over the wall so mortar recedes, but crevices pick up tone.
- After drying, gently clean brick faces with a damp sponge to reveal contrast.
4. Shadowing & Aging Effects
- Apply a black or dark brown wash selectively in corners, lower edges, or recesses.
- Use powdered pigments (earth tones, charcoal) to simulate soot, dirt, or moss.
- Highlight edges and chips with a lighter dry-brushed color.
- Add moisture stains, efflorescence (white powdery effect), or streaks for realism.
5. Sealing & Protection
Once satisfied, seal the wall with a matte or satin clear coat to bind pigments and protect surfaces. Avoid glossy finishes unless aiming for stylized brick.
Advanced Techniques & Variations
To elevate your miniature brick work, consider integrating these advanced tricks:
- Curved or arched bricks: Build molds with curved cavities or thin slices of clay bent over forms before curing.
- Mixed material façade: Combine brick blocks with stone blocks, wood beams, or metal cladding in the same wall.
- Embedded signage or relief: Before curing clay bricks, press in text, address plaques, or relief designs.
- Crumbling / damaged bricks: At selective positions, chip away minute details or create cracks with a fine blade.
- Backlit mortar: In translucent materials (resin bricks), thin mortar lines may allow backlight illusion.
- Moss, ivy & vegetation: After sealing, apply finely ground flocking, static grass, or tinted glue lines to simulate organic growth in mortar joints.
- Alternating brick bond patterns: Use Flemish bond, English bond, or more decorative patterns rather than simple running bond.
You can even incorporate sections built ahead and later inserted as panels (modular facades) so that in tight interior spaces you can construct off-model and then attach as ready-made walls.
Use Cases & Creative Project Ideas
Once you master miniature brick making, your imaginative purview expands dramatically. Here are concrete applications and project ideas:
- Facade walls for dollhouses: Use your custom bricks for the exterior of 1:12 or 1:24 scale houses.
- Chimneys & fireplaces: Small brick modules that sit over wood or styrene cores.
- Garden paths, patios & walkways: Flat sections of brick or paver brick on foam or wood slabs.
- Retaining walls or foundation wainscoting: Partial brick layers around basements or cellars.
- Diorama urban scenes: Brick alleyways, factory walls, or historical ruins.
- Accent walls & interior vintage features: Exposed interior brick in loft-style rooms or basements.
- Brick signage or address plaques: Use miniature bricks as backs for installation of plaques or numbers.
For additional creative inspiration, explore Creative Miniature Brick Projects: From Dollhouses to Dioramas, which offers project galleries, ideas, and techniques to expand your toolkit.
One tip: always test a small piece or “mock wall” before doing the full scale run. That allows you to debug adhesion, paint layers, and mortar behavior without risking your main project.
Troubleshooting & Quality Tips
Even experienced miniaturists run into issues. Here are common problems and how to remedy them:
| Problem | Cause | Solution |
|---|---|---|
| Cracked bricks | Shrinkage, uneven drying | Dry slowly; use reinforcement; control humidity |
| Warped thin bricks | Insufficient rigidity | Increase thickness slightly or embed support (wire/mesh) |
| Mortar stains on faces | Overapplication or slow cleaning | Clean immediately; mask faces; retouch with paint |
| Adhesion failure | Incompatible glue / surface | Use epoxy or prime substrates; lightly sand for grip |
| Color too flat | Single shade paint | Add washes, speckles, and dry-brushing for variation |
| Overscale mortar lines | Misproportioned grid | Recalculate joint widths by scale; redesign grids |
| Heavy walls sagging | Weak substrate | Use thicker backing; add vertical braces |
| Uneven courses | Inaccurate leveling | Use straightedges, reference lines, and clamps |
Also, don’t forget to document your recipes and mixing ratios. That way, future batches match earlier walls exactly—even months later.
Summary & Next Steps
Creating high-fidelity miniature bricks by hand gives you creative freedom, cost control, and the satisfaction of crafting every detail. This guide has walked you through:
- Understanding scale and proportion
- Selecting the right substrate materials
- Four robust methods of miniature brick making
- Detailed guidance for applying bricks in a build
- Painting, grouting, and weathering to realism
- Advanced variations and modular techniques
- Creative uses in dollhouses and dioramas
- Troubleshooting common pitfalls
If you’re ready to dive deeper, check out Best Materials for Making Miniature Bricks at Home for material comparisons and tool suggestions.
Your next step is to start a small mock wall at your target scale. Try one of the simpler methods (clay or foam) and test paint/aging effects. Iterate, refine, and gradually scale to full walls. Over time, you’ll develop your own favorite recipes and signature brick style.
FAQs
-
Q: What scale is best for miniature bricks?
A: It depends on your project. 1:12 is most common (1 inch = 1 foot), but you can use 1:24 or 1:48 depending on your dollhouse/diorama scale. You’ll need to reduce real brick dimensions proportionally, including mortar width. -
Q: How thin can miniature bricks be before they break?
A: Thin bricks (less than 1 mm) are fragile unless reinforced. It’s safer to give bricks at least 1–2 mm thickness (depending on scale) or embed thin wire/mesh reinforcement for strength. -
Q: Can I use 3D printing for miniature bricks instead?
A: Yes—resin or FDM printing is increasingly used. But material differentiation (brick vs mortar) and fine texture can be harder to achieve than with clay, grout, or mold casting. -
Q: How do I avoid mortar bleeding onto brick faces?
A: Use masking, apply thin mortar carefully, clean excess immediately while soft, and retouch with paint once dry. Using a sealant on brick face before mortaring can help. -
Q: Which material gives the most realistic brick texture?
A: Grout/resin cast bricks tend to have the most realistic surface. But clay and cork can look excellent with careful finishing. The “realism” often comes from paint, weathering, and mortar work. -
Q: Is there a way to mass-produce bricks efficiently?
A: Yes—mold casting with a well-constructed grid mold and consistent mixture lets you produce hundreds of bricks with uniform dimensions and texture. -
Q: Can I mix brick methods in one model?
A: Certainly. It’s common to combine molded bricks for broad walls, clay detail bricks for corners or accents, and foam or cork for hidden or interior surfaces. -
Q: How long does it take to weather bricks realistically?
A: Weathering is often incremental. An initial wash + light aging may take a day or two (including drying). For more dramatic aging (e.g. moss, efflorescence), allow additional time between layers to build depth gradually.